
After downloading the code from BitBucket, you'll need to create a directory for your project. Create a new Blank Solution (found under Other Project Types: Visual Studio Solutions) in Visual Studio and be sure to put the solution in your project directory (/Home/Documents/Visual Studio/Projects/).
Using Windows Explorer, go to your solution folder and create two new folders: one with your project name and the other entitled "Frameworks." For the purposes of this tutorial, we'll name our project MyFirstProject. You should modify this to pertain to your project.
In Visual Studio, create a new solution folder called, "Frameworks." Then, right-click the folder and select "Add Existing Project." Add the following projects one at a time:
It is a good practice to keep the solution folder structure in Visual Studio the same as the directory structure on the disk.
For your own reference, under the Frameworks folder you may create a new solution folder called "SupermodelTest." Within that folder, create another new solution folder entitled, "Web." To this folder, add the existing projects "TestDomain.csproj," "TestWeb.csproj," and "XamarinModelGenerator.csproj." These projects show you a simple Supermodel app that could be used as a reference implementation, showing you (among other things) a proper file structure and UI component usage.
Add another solution folder under Frameworks entitled, "Utils." To this folder, add the existing project RuntimeGenerator.csproj. This project is used to generate Xamarin Mobile runtime. It is part of the Supermodel framework, but you don't need to do anything with it.
Right-click on your project folder and select "Add," then "New Project." Select Class Library (under Visual C#) and name it "Domain." Make sure to select .NET framework 4.5.2. If you forget to initially select .NET framework 4.5.2, you can right click on your Domain class library, select properties, and change the framework to the correct version. You may delete the default Class1.cs file under Domain.
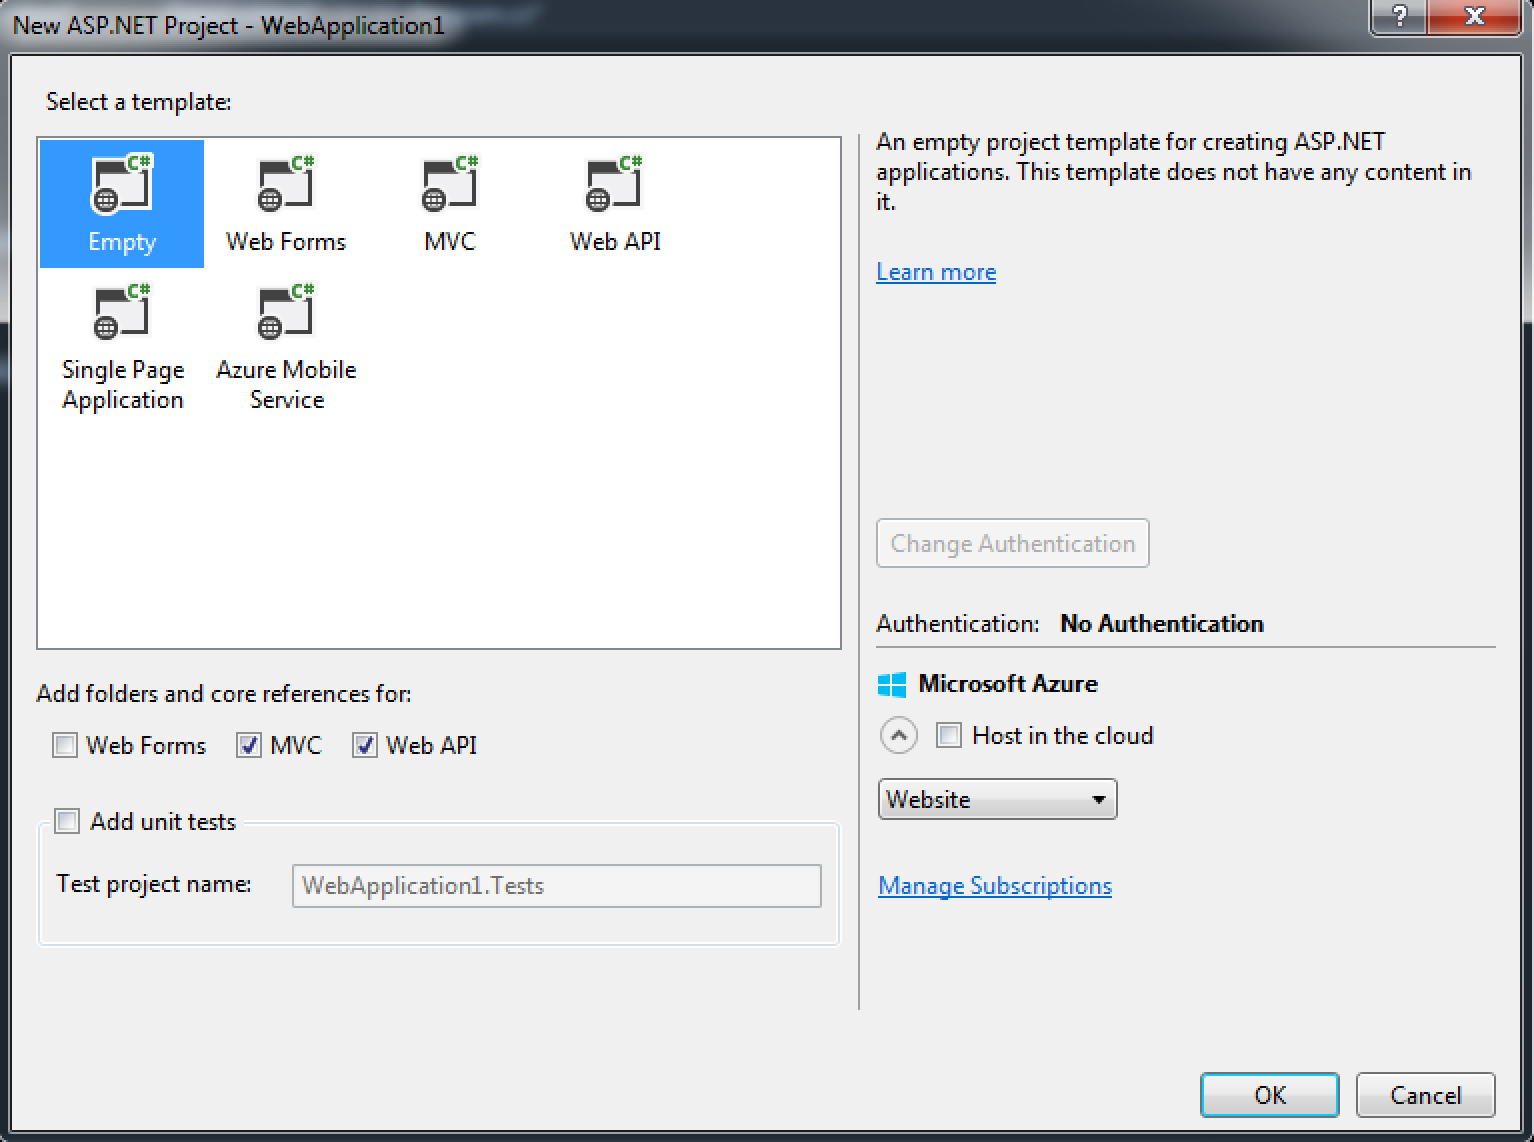
Depending on what type of project you are creating, you may select any number of project formats. For the purpose of this setup, let's say you want to create a Web project. Under your project solution, create a new ASP.NET Web Application called "Web."
Create a Empty Web project, checking off MVC and Web API.
Right-click the solution and select "Enable NuGet Package Restore." At this point, you should be able to build your project and have everything running smoothly.
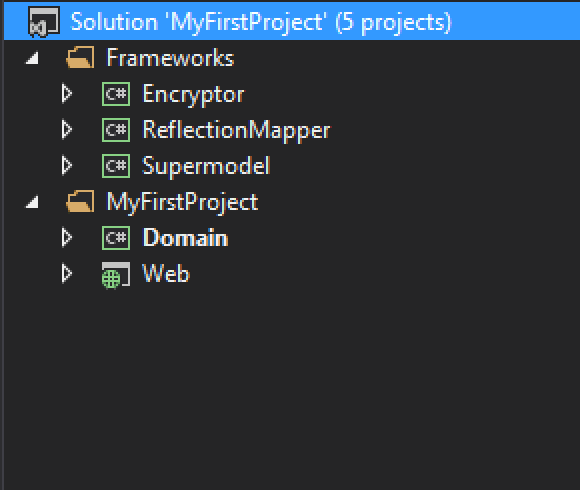
Your file hierarchy in your Solution Explorer should look like this:
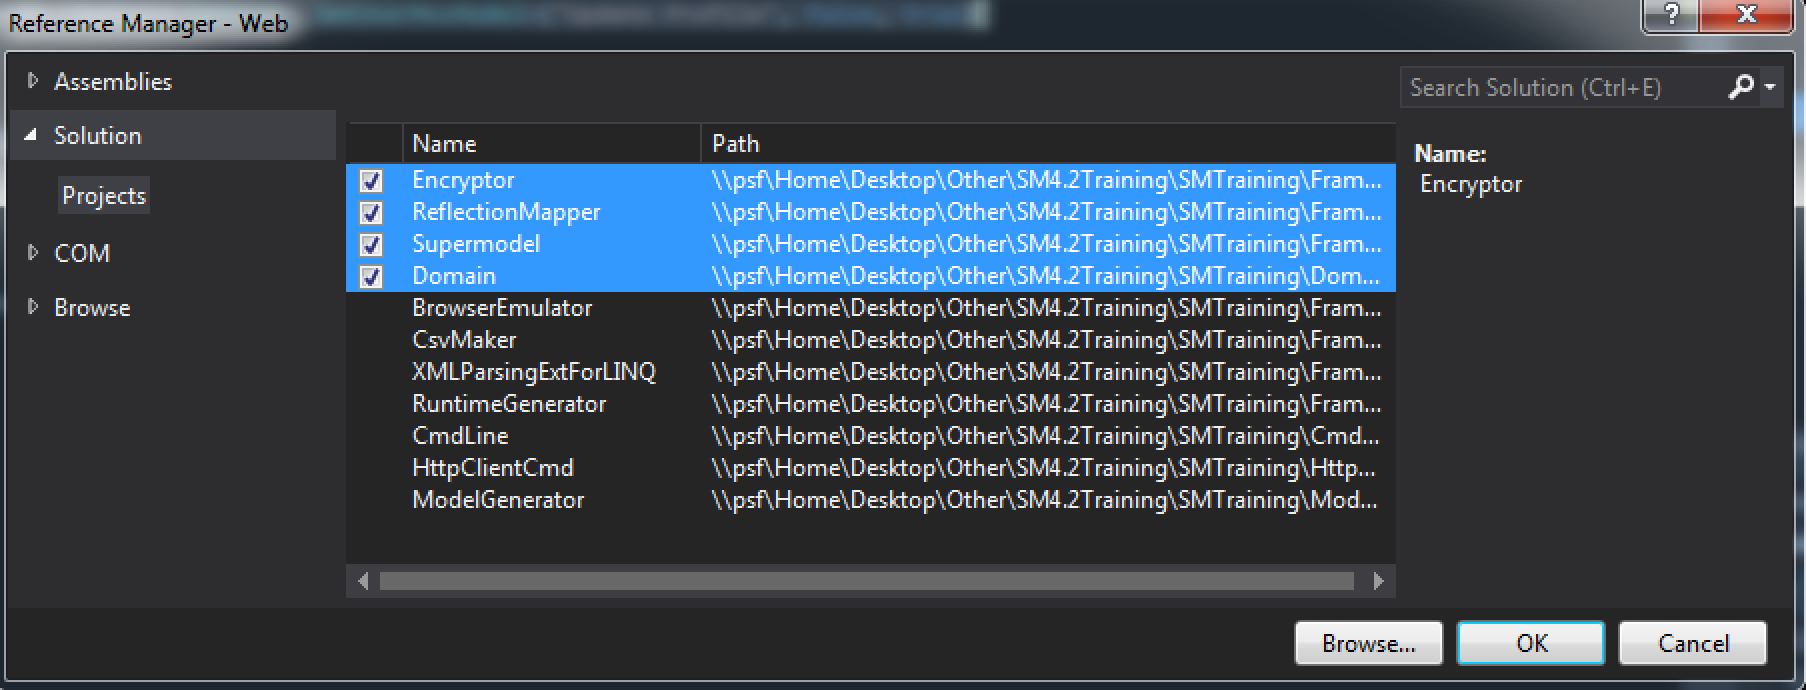
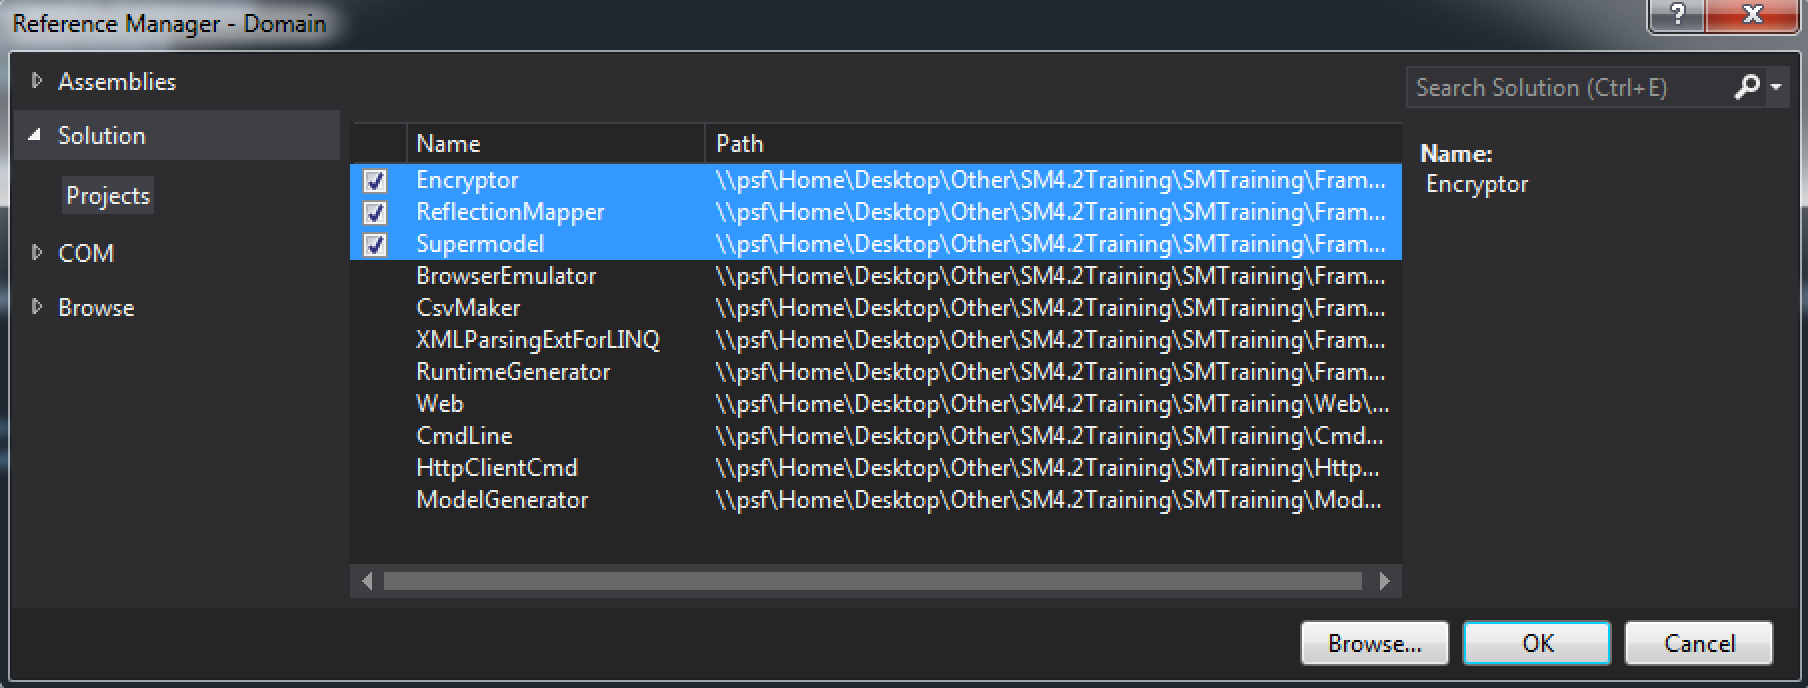
Now, you need your Web project to reference your Domain library. Right-click your Web project and add a reference to Domain. You will also need to add references to Supermodel, ReflectionMapper, and Encryptor projects to both Domain and Web.
Both Domain and Web will need additional NuGet packages. Right-click Domain and select Manage NuGet Packages, and install the following:
Repeat the above step, but this time add the listed NuGet packages to the Web Project.
Now you're ready to start writing some code to initialize Supermodel! Under Domain, create a new folder "Supermodel." You will put Supermodel-related code here. Within that folder, create another folder, "Persistance." This folder will be used for setting up your database context, your database initializers, and the unit of work. Create three new classes within this folder: MyFirstProjectDbContext.cs, MyFirstProjectInitializers.cs, and MyFirstProjectUnitOfWork.cs.
In your database context class, you need to pass the name of the connection string in your Web.config file (or you can pass the actual connection string if you choose to store it in a place other than Web.config) to your base constructor:
using Supermodel.DDD.UnitOfWork

namespace Domain.Supermodel.Persistance
{
	public class MyFirstProjectDbContext : EFDbContext
	{
		public MyFirstProjectDbContext() : base("MyFirstProjectDb") { }
	}
}
Assuming you are not using Entity Framework migrations, you need to create three initializer classes (see Entity Framework documentation for details) as well as a static class with a common data initializer to seed your database with data. We use that static class to prevent us from duplicating the seed code in every one of the three initializer classes. In our case, we don't really need the common data initializer, so we leave the seed method empty for now.
using System.Data.Entity;

namespace Domain.Supermodel.Persistance
{
	public static class DataInfoInitializer
	{
		public static void Seed(MyFirstProjectDbContext context) { }
	}

	public class MyFirstProjectDropCreateDatabaseIfModelChanges : DropCreateDatabaseIfModelChanges<MyFirstProjectDbContext>

	{
		protected override void Seed(MyFirstProjectDbContext context)
		{
			base.Seed(context);
			DataInfoInitializer.Seed(context);
		}
	}

	public class MyFirstProjectDropCreateDatabaseAlways : DropCreateDatabaseAlways<MyFirstProjectDbContext>
	{
		protected override void Seed(MyFirstProjectDbContext context)
	 	{
		   base.Seed(context);
		   DataInfoInitializer.Seed(context);
	 	}
	}

	public class MyFirstProjectCreateDatabaseIfNotExists : CreateDatabaseIfNotExists<MyFirstProjectDbContext>
	{
		protected override void Seed(MyFirstProjectDbContext context)
		{
	   		base.Seed(context);
	   		DataInfoInitializer.Seed(context);
	 	}
	}
}
Finally, write the following code in your UnitOfWork class. Note that UnitOfWork takes a parameter that specifies whether the UnitOfWork is read-only or not. This is a typical convention used in Supermodel. The default UnitOfWork is read and write. In order to make it read-only, you have to specify this explicitly. In this case, we specified that the default should be ReadOnly.No (read/write):
using Supermodel.DDD.UnitOfWork;

namespace Domain.Supermodel.Persistance
{
	public class MyFirstProjectUnitOfWork : EFUnitOfWork<MyFirstProjectDbContext>
	{
		public MyFirstProjectUnitOfWork(ReadOnly readOnly = ReadOnly.No) : base(readOnly) { }
	}
}
Then, update Web.config to include the following under app settings and connection string:
<<appSettings>
	<add key="webpages:Version" value="3.0.0.0" />
	<add key="webpages:Enabled" value="false" />
	<add key="PreserveLoginUrl" value="true" />
	<add key="ClientValidationEnabled" value="true" />
	<add key="UnobtrusiveJavaScriptEnabled" value="true" />
	<add key = "Supermodel.UseInitializerIdx" value="1" />
</appSettings>

<connectionStrings>
	<add name="MyFirstProjectDb" providerName="System.Data.SqlClient" connectionString="Data Source=localhost\SQL_DEVELOPER;
	Initial Catalog=MyFirstProjectDb; Integrated Security=True; Pooling=False; MultipleActiveResultSets=True;" />
</connectionStrings>
In Global.asax.cs you will create a list of Database Initializers. Since in your Web.config file you've specified Supermodel.UseInitializerIdx is set to "1" (it's zero-based), the Global.asax file will select MyFirstProjectDropCreateDatabaseIfModelChanges( ) (see code snippet below) as the initial database configuration. If you don't specify the index in Web.config, it will default to "0":
using System;
using System.Web;
using Systen.Web.Mvc;
using Domain.Supermodel.Persistance;
using Supermodel;

namespace Web
{
	public class Global : HttpApplication
	{
		void Application_Start(object sender, EventArgs e)
		{
			AreaRegistration.RegisterAllAreas();
			SupermodelInitialization.Init<MyFirstProjectDbContext>();
			InitializerManager.InitPerConfig(new List<IDatabaseInitializer<MyFirstProjectDbContext>>
			{
				new MyFirstProjectCreateDatabaseIfNotExists(),
				new MyFirstProjectDropCreateDatabaseIfModelChanges(),
				new MyFirstProjectDropCreateDatabaseAlways()
			});
		}
	}
}
Notice the type parameter in the SupermodelInitialization.Init( ) method. You must pass the DbContext as the type parameter there. This is a default DbContext type that will be used when a transaction is created for batch processing of multiple Web API calls in the same transaction.
And there you have it! Now, you can start developing.
Let's start by creating a simple CRUD application to give you an idea of what Supermodel can do. The first thing we'll need to do is create an Entity. Start by creating a folder called "Entities" within your Domain.
Let's create a database of characters in The Simpsons. We'll add a class to our Entities folder called SimpsonsCharacters.cs. Our SimpsonsCharacter Entity will have the properties Name, Occupation, and VoicedBy which will
show the name of the actor who voices the character.
public class SimpsonsCharacter : Entity
{
	public string Name { get; set; }
	public string Occupation { get; set; }
	public string VoicedBy { get; set; }
}
Now, we can seed our database using the Seed( ) method in the MyFirstProjectInitializers class:
using System.Data.Entity;

namespace Domain.Supermodel.Persistance
{
	public static class DataInfoInitializer
	{
		public static void Seed(MyFirstProjectDbContext context)
		{
			var characters = new[]
			{
				new SimpsonsCharacter
				{
					Name = "Homer Simpson",
					Occupation = "Nuclear Safety Inspector",
					VoicedBy = "Dan Castellaneta"
				},

				new SimpsonsCharacter
				{
					Name = "Marge Simpson",
					Occupation = "Homemaker",
					VoicedBy = "Julie Kavner"
				},

				new SimpsonsCharacter
				{
					Name = "Ned Flanders",
					Occupation = "Owner, The Leftorium",
					VoicedBy = "Harry Shearer"
				},

				new SimpsonsCharacter
				{
					Name = "Moe Szyslak",
					Occupation = "Bartender",
					VoicedBy = "Hank Azaria"
				},

				new SimpsonsCharacter
				{
					Name = "Edna Krabappel",
					Occupation = "Teacher",
					VoicedBy = "Marcia Wallace"
				},

				new SimpsonsCharacter
				{
					Name = "Sideshow Bob",
					Occupation = "TV Personality",
					VoicedBy = "Kelsey Grammer"
				}
			};

			foreach (var character in characters) context.Set<SimpsonsCharacter>().Add(character);
		}
	}

	public class MyFirstProjectDropCreateDatabaseIfModelChanges : DropCreateDatabaseIfModelChanges<MyFirstProjectDbContext>

	{
		protected override void Seed(MyFirstProjectDbContext context)
		{
			base.Seed(context);
			DataInfoInitializer.Seed(context);
		}
	}

	public class MyFirstProjectDropCreateDatabaseAlways : DropCreateDatabaseAlways<MyFirstProjectDbContext>
	{
		protected override void Seed(MyFirstProjectDbContext context)
	 	{
		   base.Seed(context);
		   DataInfoInitializer.Seed(context);
	 	}
	}

	public class MyFirstProjectDropCreateDatabaseIfNotExists : DropCreateDatabaseIfNotExists<MyFirstProjectDbContext>
	{
		protected override void Seed(MyFirstProjectDbContext context)
		{
	   		base.Seed(context);
	   		DataInfoInitializer.Seed(context);
	 	}
	}
}
The next thing we need to do is create a basic MVC Model for our Entity. MVC Models know how to map themselves to and from Entities. They also know how to render themselves in HTML and how to model-bind themselves. We'll create our MVC Model in the same file in which we defined our SimpsonsCharacter Entity:
public class SimpsonsCharacterMvcModel : MvcModelForEntity<SimpsonsCharacter>
{
	public TweeterBS.TextboxForStringMvcModel Name { get; set; }
	public TweeterBS.TextboxForStringMvcModel Occupation { get; set; }
	public TweeterBS.TextboxForStringMvcModel VoicedBy { get; set; }

	public override string Label
	{
		get { return Name.Value; }
	}
}

public class SimpsonsCharacter : Entity
{
	public string Name { get; set; }
	public string Occupation { get; set; }
	public string VoicedBy { get; set; }
}
By using TweeterBS.TextboxForStringMvcModel, all of our textboxes will be styled as Twitter Bootstrap textboxes.
Next, we need to add a CRUD Controller for our Entity. Controllers orchestrate user interactions. Thus, the controller will allow us to Create, Read, Update, and Delete Entities. We'll create this controller class under our Web Project in the folder named Controllers. We must pass three parameters to SyncMvcCRUDController: our Entity, our MVC Model, and our DbContext.
public class SimpsonsCharacterController : SyncMvcCRUDController<SimpsonsCharacter, SimpsonsCharacterMvcModel, MyFirstProjectDbContext> { }The last thing that we need to do is create a View for our Entity. First, you need to define the MasterLayout in your MasterLayout.cshtml file under the directory ~/Shared/Views/. With Supermodel, you have the option of using Twitter Bootstrap, JQuery Mobile, or a generic layout that you can style yourself. We'll use the TweeterBS renderer so that our View is rendered using the Twitter Bootstrap library.
We'll pass a title for our View, the Version of JQuery we wish to use, and the Version of Twitter Bootstrap we wish to use. You'll see how easy it is to switch styles shortly.
@using Supermodel.Extensions
@Html.Supermodel().TweeterBS.MasterLayout(this, "My First Project", "1.10.1", "2.3.2")

<style>
    body {
        margin: 40px;
    }

    .form-horizontal .controls {
        margin-left: 0px !important;
        margin-top: 20px;
    }
</style>
Adding formatting between <style> isn't necessary for the application to work, but it helps create a more visually appealing website. Normally we would put this kind of styling in the .css file, but for the purpose of this tutorial, it’s acceptable to place it right in the .cshtml file.
Then, we'll create two basic Views for our application: a List View and a Detail View. First, we'll create a List View that will display the list of Simpsons Characters:
@using Domain.Entities
@using Supermodel.Extensions
@using Web.Controllers
@model List<SimpsonsCharacterMvcModel>
@{
Layout = "~/Views/Shared/MasterLayout.cshtml";
}
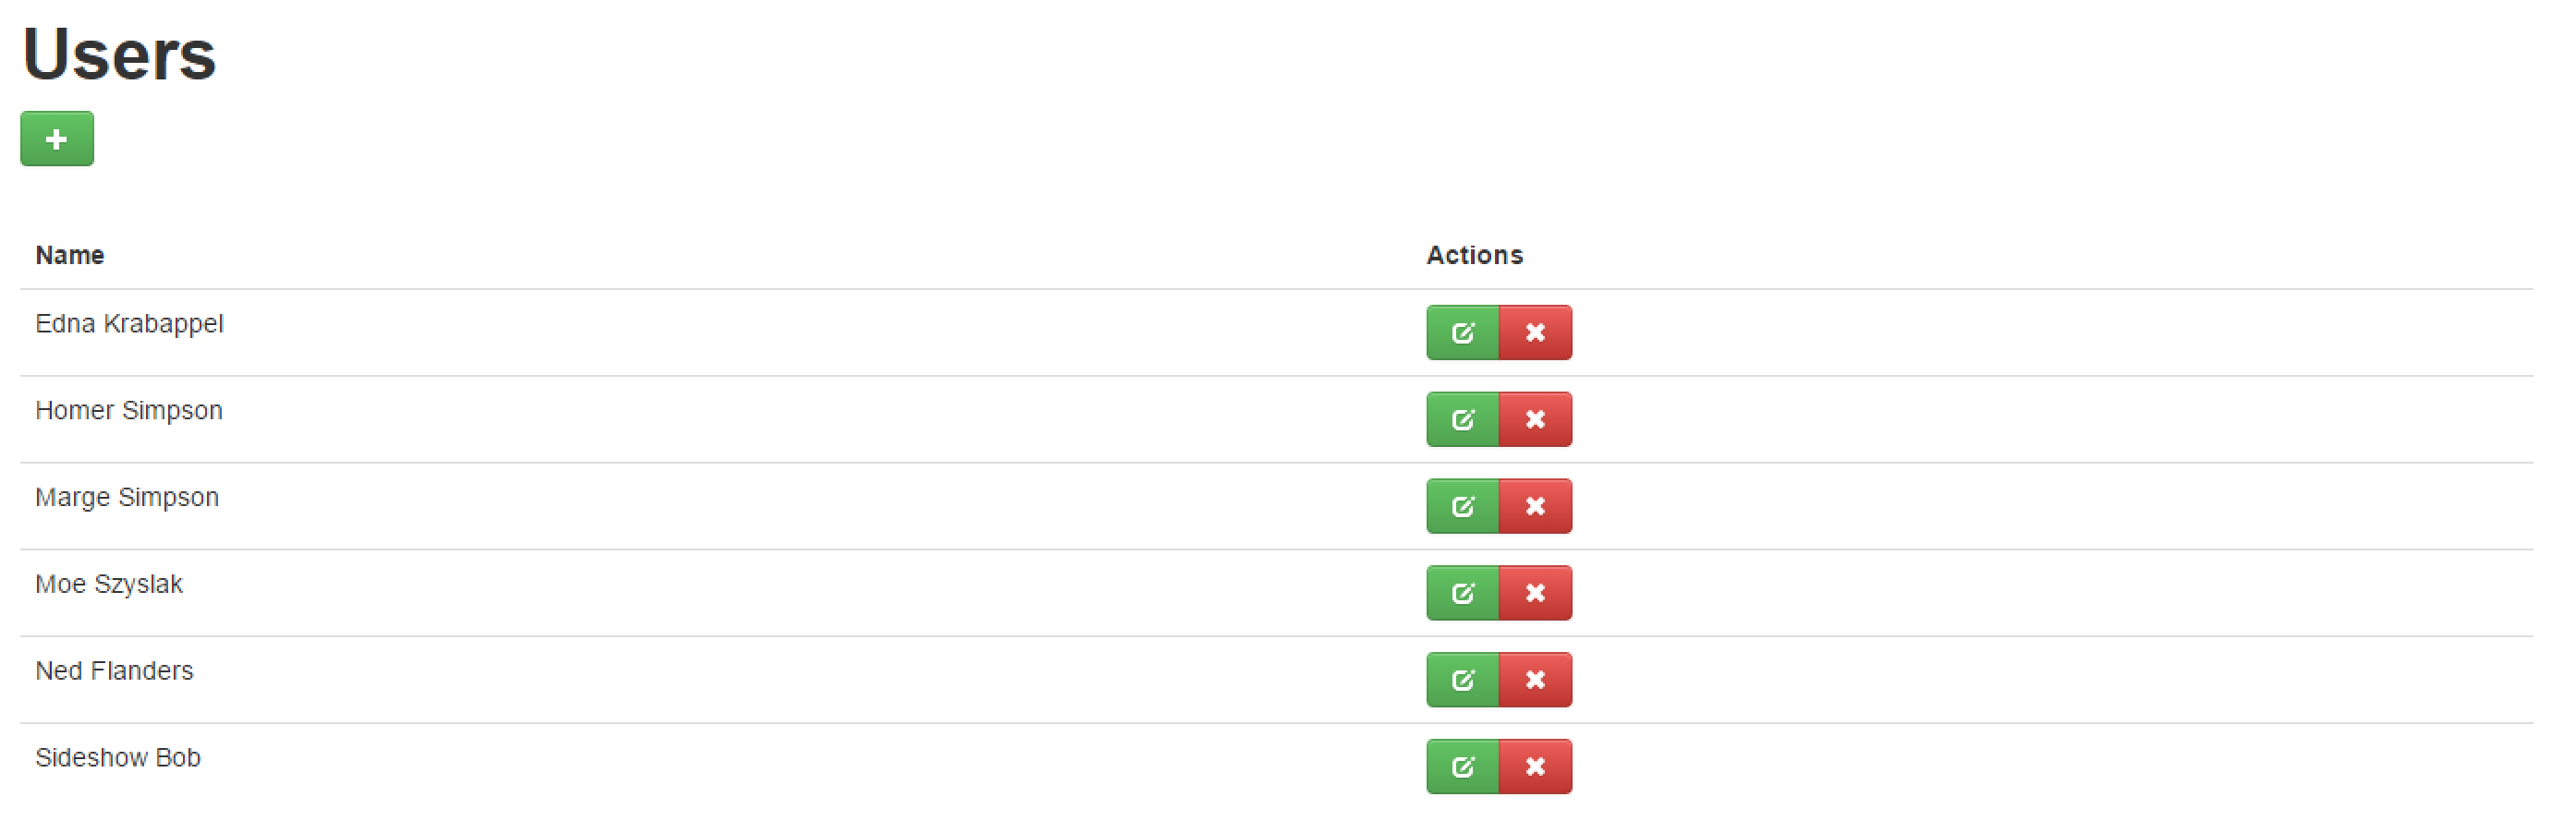
@(Html.Supermodel().TweeterBS.CRUDList<SimpsonsCharacter, SimpsonsCharacterMvcModel>(Model, typeof (SimpsonsCharacterController), "Users"))The last thing we need to do is go to Web Properties (found under the Project tab) and change the Start Action to be the Specific Page "SimpsonsCharacter/List":

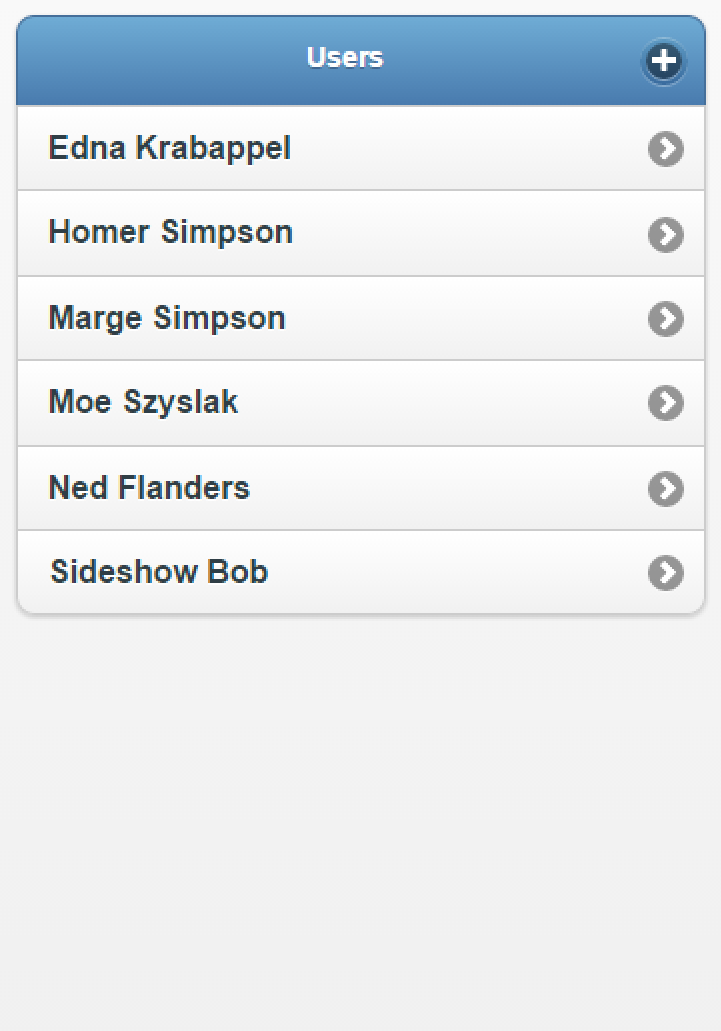
Now, you'll have a List View that looks like the following:
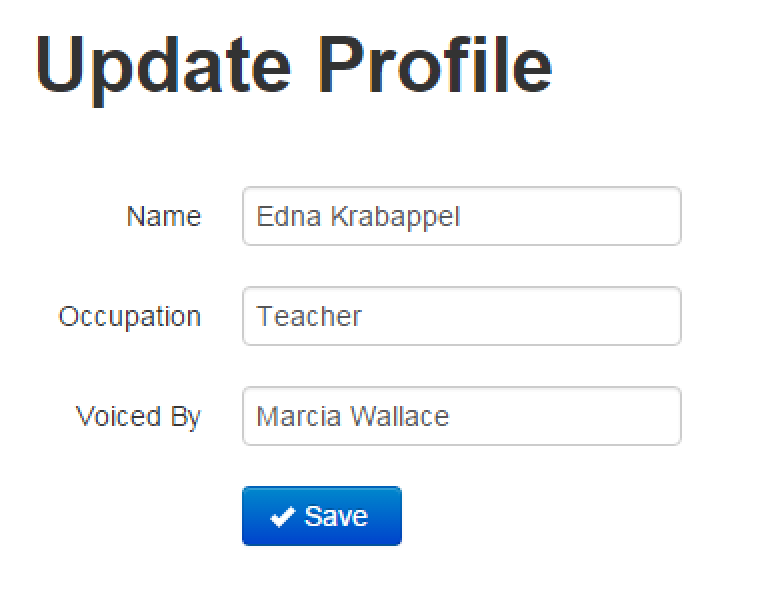
Next, we'll add a Detail View for our SimpsonsCharacter Entity:
@using Domain.Entities
@using Supermodel.Extensions
@{
Layout = "~/Views/Shared/MasterLayout.cshtml";
}
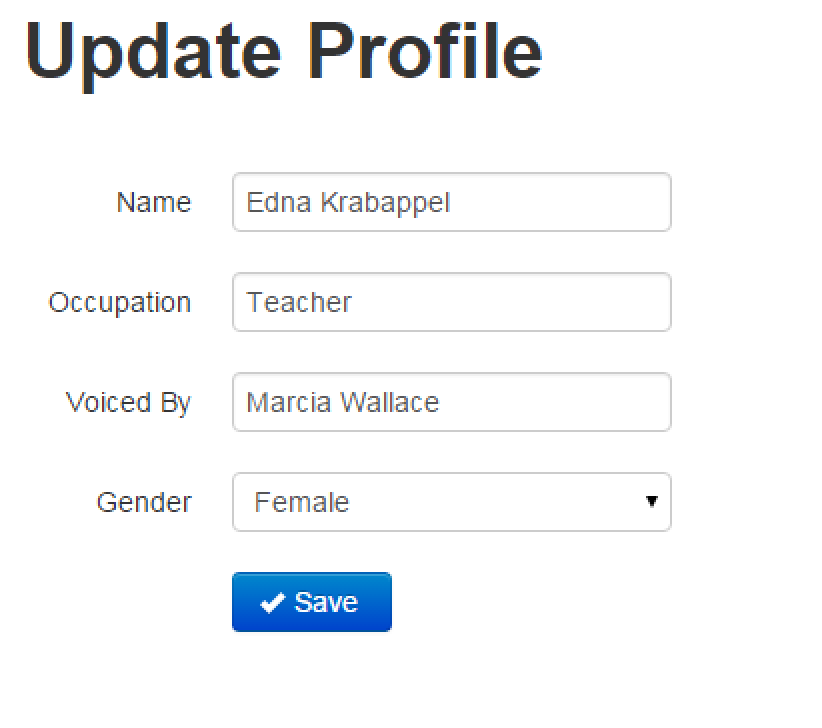
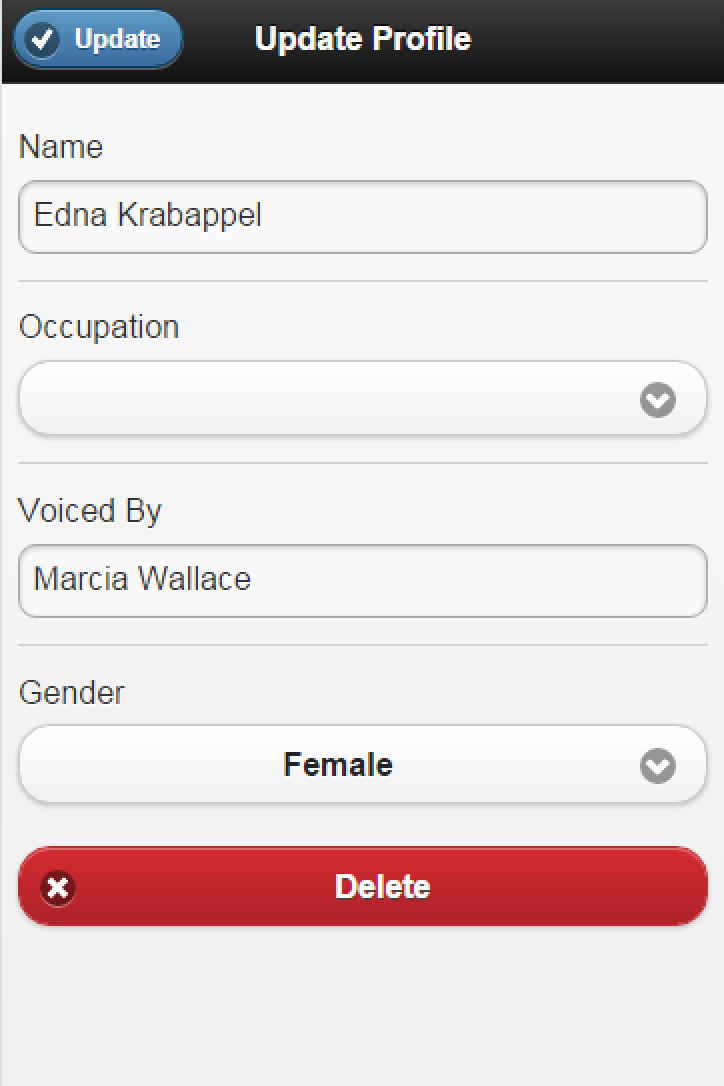
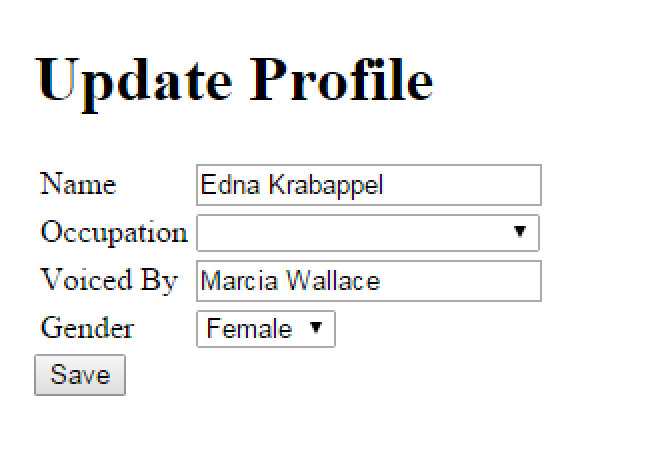
@(Html.Supermodel().TweeterBS.CRUDEdit<SimpsonsCharacter, SimpsonsCharacterMvcModel>("Update Profile", false, true))And now you'll also have a Detail View for each Simpsons Character:
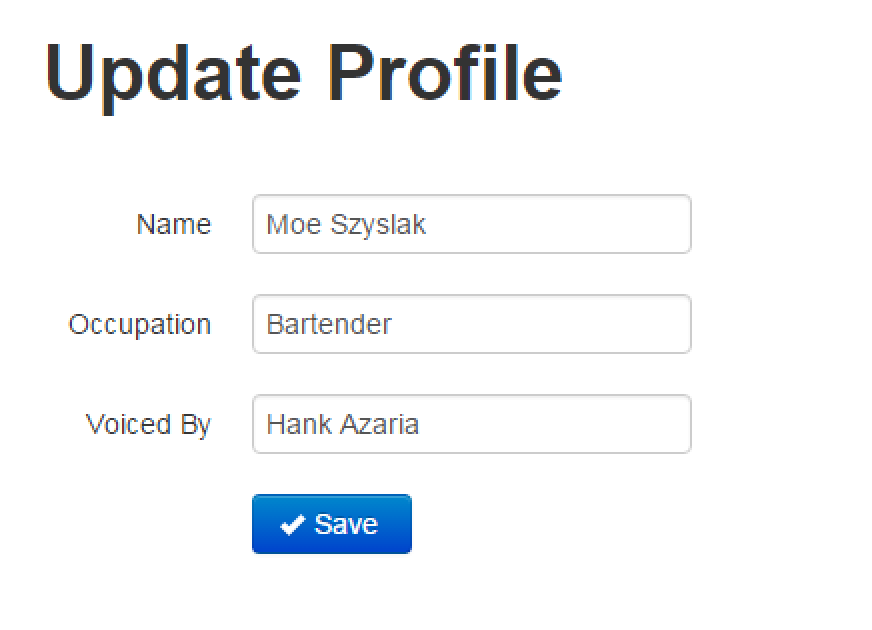
Thanks to our Supermodel CRUD Controller, we'll also be able to update Simpsons Characters by clicking the button:
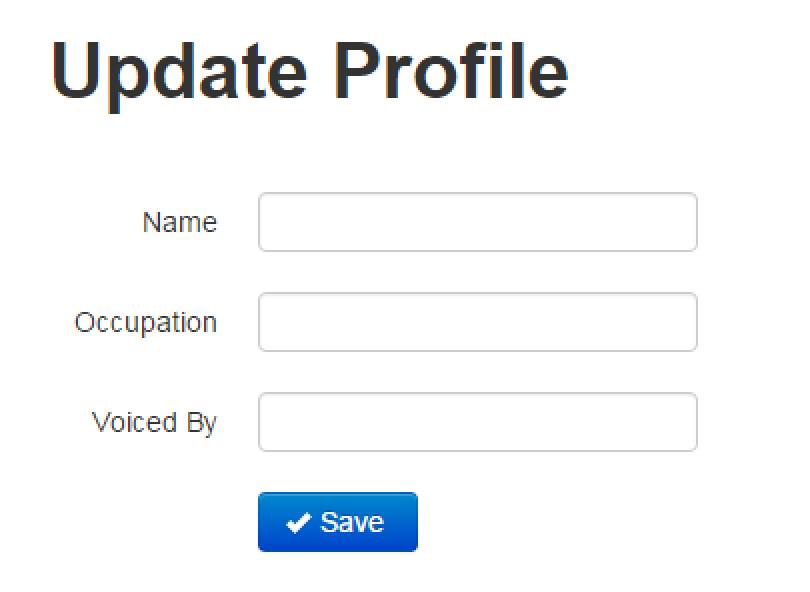
And create Simpsons Characters by clicking the button:
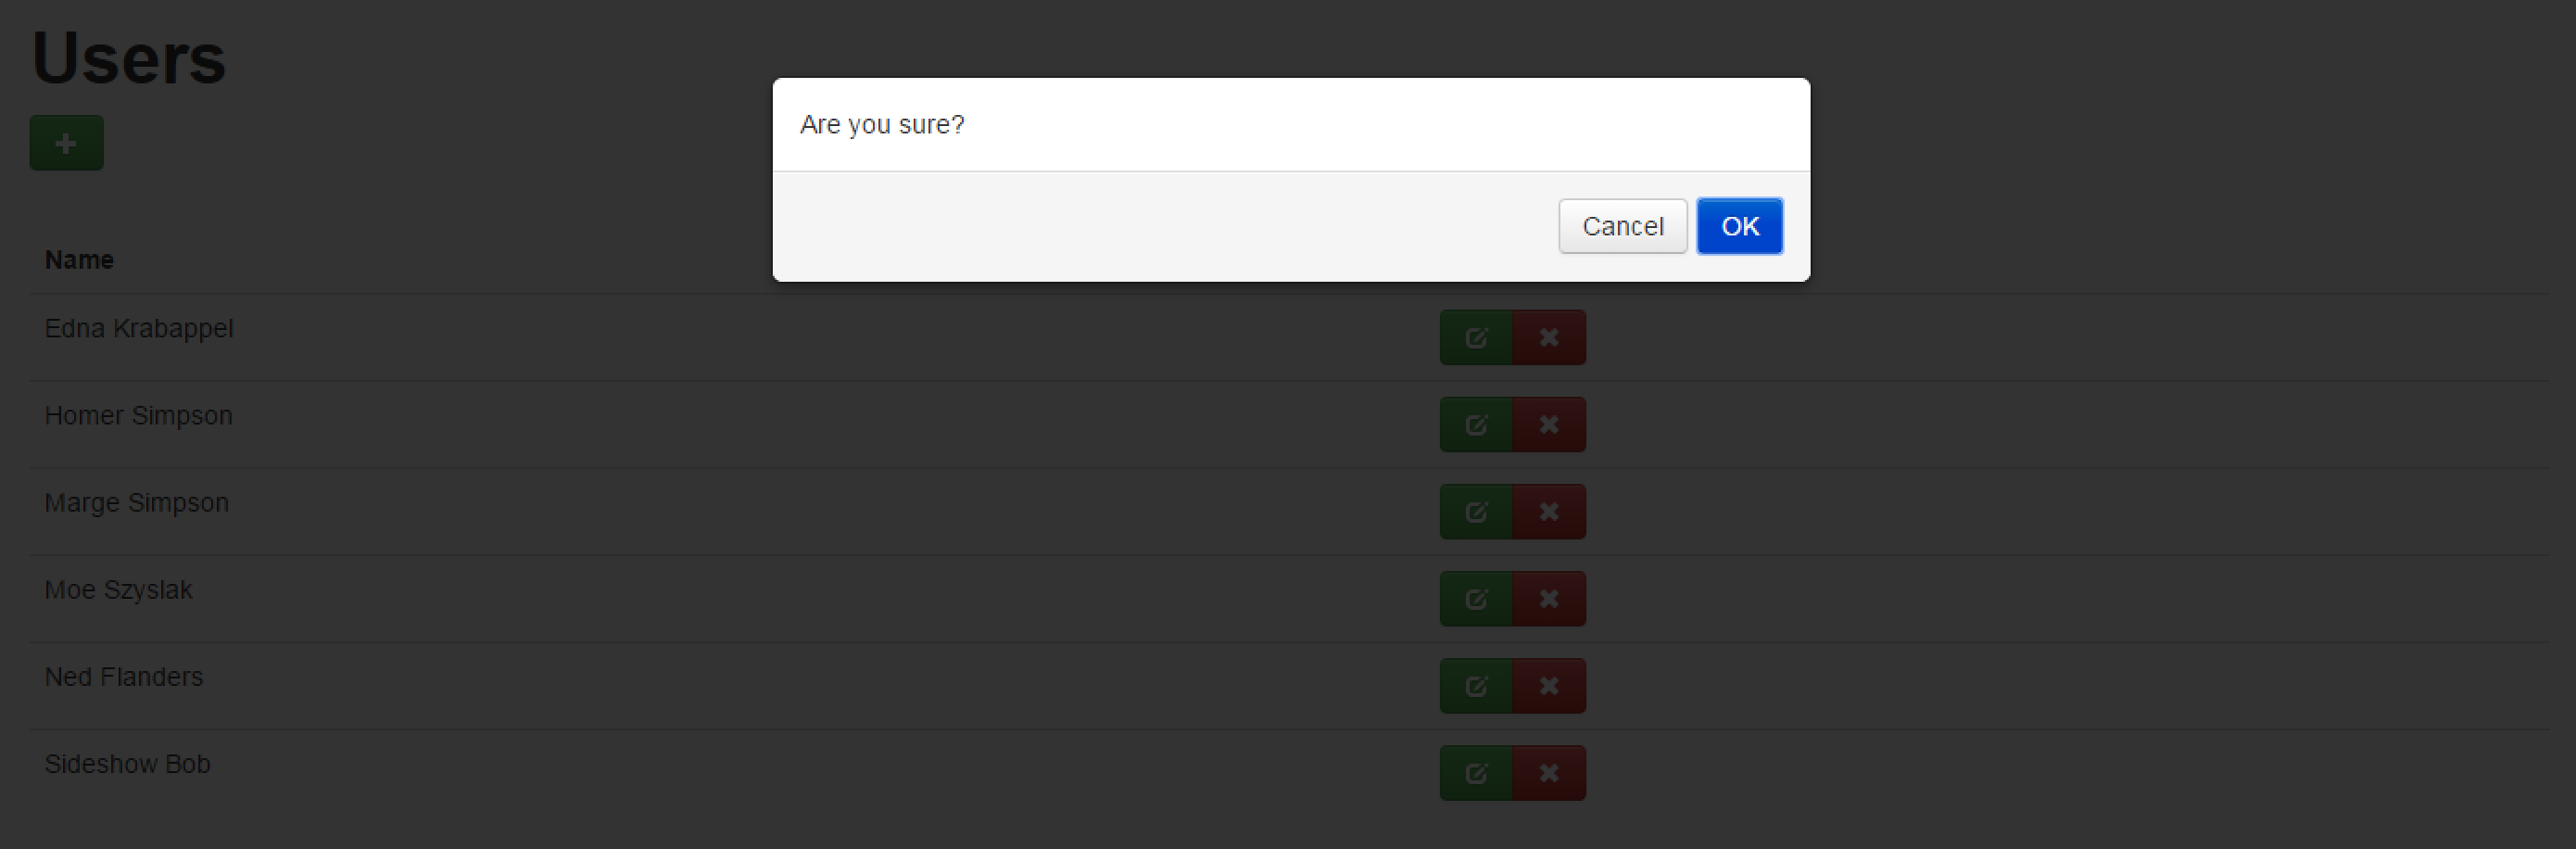
And delete Simpsons Characters by clicking the button:
It's incredibly easy to change our Model after we have created our application. Let's test this by adding a Gender Enum property to our Model. First, we'll update the Entity.
public class SimpsonsCharacterMvcModel : MvcModelForEntity<SimpsonsCharacter>
{
	public TweeterBS.TextboxForStringMvcModel Name { get; set; }
	public TweeterBS.TextboxForStringMvcModel Occupation { get; set; }
	public TweeterBS.TextboxForStringMvcModel VoicedBy { get; set; }
	public TweeterBS.DropdownMvcModelUsingEnum<SimpsonsCharacter.GenderEnum> Gender { get; set; }

	public override string Label
	{
		get { return Name.Value; }
	}
}

public class SimpsonsCharacter : Entity
{
	public enum GenderEnum { Male, Female }

	public string Name { get; set; }
	public string Occupation { get; set; }
	public string VoicedBy { get; set; }
	public GenderEnum Gender { get; set;}
}
And just like that, we've added a new property and field to our Model. All we need to do now is update our Seed( ) method in MyFirstProjectInitializers to include the new Gender property.
public static void Seed(MyFirstProjectDbContext context)
{
var characters = new[]
{
new SimpsonsCharacter
{
Name = "Homer Simpson",
Occupation = "Nuclear Safety Inspector",
VoicedBy = "Dan Castellaneta",
Gender = SimpsonsCharacter.GenderEnum.Male
},
new SimpsonsCharacter
{
Name = "Marge Simpson",
Occupation = "Homemaker",
VoicedBy = "Julie Kavner",
Gender = SimpsonsCharacter.GenderEnum.Female
},
new SimpsonsCharacter
{
Name = "Ned Flanders",
Occupation = "Owner, The Leftorium",
VoicedBy = "Harry Shearer",
Gender = SimpsonsCharacter.GenderEnum.Male
},
new SimpsonsCharacter
{
Name = "Moe Szyslak",
Occupation = "Bartender",
VoicedBy = "Hank Azaria",
Gender = SimpsonsCharacter.GenderEnum.Male
},
new SimpsonsCharacter
{
Name = "Edna Krabappel",
Occupation = "Teacher",
VoicedBy = "Marcia Wallace",
Gender = SimpsonsCharacter.GenderEnum.Female
},
new SimpsonsCharacter
{
Name = "Sideshow Bob",
Occupation = "TV Personality",
VoicedBy = "Kelsey Grammer",
Gender = SimpsonsCharacter.GenderEnum.Male
}
};
foreach (var character in characters) context.Set<SimpsonsCharacter>().Add(character);
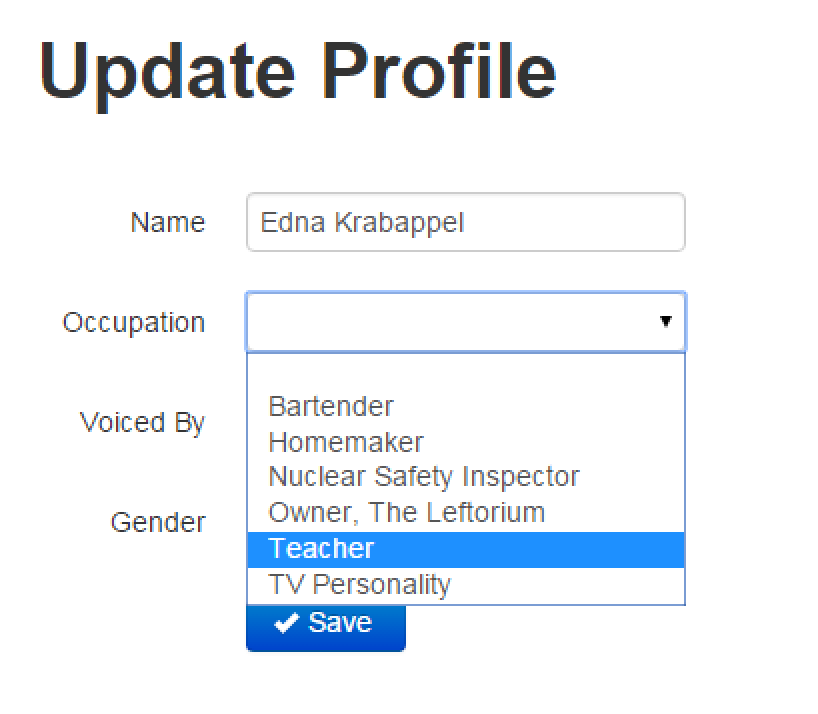
}If we rerun our application, we'll see a new dropdown menu added to our Detail View that has Genders:
Let's say that Occupation is it's own Entity and we'd like it to be a dropdown of occupations that you can choose from, as opposed to the textbox field that it is currently. How would we do this?
We'll start by creating an Occupation Entity. You can do this by creating a new class under the Entities folder named Occupation.cs. Our Occupation Entity will have one property called NameOfOccupation:
public class Occupation : Entity
{
	public string NameOfOccupation { get; set; }
}
Next, we need to create an MVC Model for our Occupation Entity:
public class OccupationMvcModel : MvcModelForEntity<Occupation>
{
	public string NameOfOccupation { get; set; }
	public override string Label { get { return NameOfOccupation; } }
}

public class Occupation : Entity
{
	public string NameOfOccupation { get; set; }
}
Then, in our SimpsonsCharacter.cs file, we need to add a property of type Occupation as well as a DropDownMvcModel that uses the OccupationMvcModel:
namespace Domain.Entities
{
    public class SimpsonsCharacterMvcModel : TweeterBS.MvcModelForEntity<SimpsonsCharacter>
    {
        public TweeterBS.TextBoxForStringMvcModel Name { get; set; }
        public TweeterBS.DropdownMvcModelUsing<OccupationMvcModel> Occupation { get; set; }
        public TweeterBS.TextBoxForStringMvcModel VoicedBy { get; set; }
        public TweeterBS.DropdownMvcModelUsingEnum<SimpsonsCharacter.GenderEnum> Gender { get; set; }

        public override string Label
        {
            get { return Name.Value; }
        }
    }
    public class SimpsonsCharacter : Entity
    {
        public enum GenderEnum { Male, Female }

        public string Name { get; set; }
        public virtual Occupation Occupation { get; set; }
        public string VoicedBy { get; set; }
        public GenderEnum Gender { get; set;}
    }
}
Finally, let's seed the database with a few occupations so that our dropdown will be populated. In the Seed( ) method of our MyFirstProjectInitializers.cs class, add the following:
 public static void Seed(MyFirstProjectDbContext context)
{
	var occupations = new[]
	{
		new Occupation{ NameOfOccupation = "Bartender" },
		new Occupation{ NameOfOccupation = "Nuclear Safety Inspector" },
		new Occupation{ NameOfOccupation = "Homemaker" },
		new Occupation{ NameOfOccupation = "Teacher" },
		new Occupation{ NameOfOccupation = "Owner, The Leftorium" },
		new Occupation { NameOfOccupation = "TV Personality" }
	};

	var characters = new[]
	{
		new SimpsonsCharacter
		{
			Name = "Homer Simpson",
			VoicedBy = "Dan Castellaneta",
			Gender = SimpsonsCharacter.GenderEnum.Male
		},

		new SimpsonsCharacter
		{
			Name = "Marge Simpson",
			VoicedBy = "Julie Kavner",
			Gender = SimpsonsCharacter.GenderEnum.Female
		},

		new SimpsonsCharacter
		{
			Name = "Ned Flanders",
			VoicedBy = "Harry Shearer",
			Gender = SimpsonsCharacter.GenderEnum.Male
		},

		new SimpsonsCharacter
		{
			Name = "Moe Szyslak",
			VoicedBy = "Hank Azaria",
			Gender = SimpsonsCharacter.GenderEnum.Male
		},

		new SimpsonsCharacter
		{
			Name = "Edna Krabappel",
			VoicedBy = "Marcia Wallace",
			Gender = SimpsonsCharacter.GenderEnum.Female
		},

		new SimpsonsCharacter
		{
			Name = "Sideshow Bob",
			VoicedBy = "Kelsey Grammer",
			Gender = SimpsonsCharacter.GenderEnum.Male
		}
	};

	foreach (var character in characters) context.Set<SimpsonsCharacter>().Add(character);
	foreach (var  occupation in occupations) context.Set<Occupation>().Add(occupation);
}
Now, if we look at the Detail View of one of our SimpsonCharacter Entities, we'll see that Occupation is now a DropdownMvcModel populated with Occupations.
Note how adding or changing properties for a SimpsonsCharacter does not require us to make any changes to Controllers and Views. We just made changes to the Entity to specify that our Entity now carries additional information and made changes to the MVC Model to specify how the new data should be displayed. Our code is really DRY.
You can tweak the way screens look and act if you need to. If it needs to be a little different, it will likely be a little change. Whereas if it needs to look quite a bit different, it is still possible. Bottom line is, you only have to define the “delta” (what is non-standard). Everything else is “by convention."
Finally, we want to show you how easy it is to switch between Twitter Bootstrap, JQuery Mobile, and generic styling. We've already shown you how to implement rendering for Twitter Bootstrap, so let's try switching to JQuery Mobile. JQuery Mobile allows you to create Views suitable for mobile platforms. Supermodel has a solution for creating native mobile applications, which is still in Beta. This solution allows you to create native iOS and Android applications using Xamarin. In order to implement JQuery Mobile in our application, we will only need to update our MasterLayout, our MVC Model, and our Views. We'll start by updating the MasterLayout to use JQMobile. MasterLayout takes the following parameters: the webpage, the page title, the version of JQuery we wish to use, the version of JQuery Mobile we wish to use, and a boolean that specifies whether or not to remove iPhone browser bars.
@using Supermodel.Extensions
@Html.Supermodel().JQMobile.MasterLayout(this, "My First Project", "1.10.1", "1.3.1", true)

<style>
    body {
        margin: 40px;
    }

    .form-horizontal .controls {
        margin-left: 0px !important;
        margin-top: 20px;
    }
</style>
Next, you must update your MVC Model to use JQMobile:
namespace Domain.Entities
{
    public class SimpsonsCharacterMvcModel : JQMobile.MvcModelForEntity<SimpsonsCharacter>
    {
        public JQMobile.TextBoxForStringMvcModel Name { get; set; }
        public JQMobile.DropdownMvcModelUsing<OccupationMvcModel> Occupation { get; set; }
        public JQMobile.TextBoxForStringMvcModel VoicedBy { get; set; }
        public JQMobile.DropdownMvcModelUsingEnum<SimpsonsCharacter.GenderEnum> Gender { get; set; }

        public override string Label
        {
            get { return Name.Value; }
        }
    }
    public class SimpsonsCharacter : Entity
    {
        public enum GenderEnum { Male, Female }

        public string Name { get; set; }
        public virtual Occupation Occupation { get; set; }
        public string VoicedBy { get; set; }
        public GenderEnum Gender { get; set;}
    }
}
Finally, you need to update the List and Detail Views. Your List View will be as follows:
@using Domain.Entities
@using Supermodel.Extensions
@using Web.Controllers
@model List<SimpsonsCharacterMvcModel>
@{
    Layout = "~/Views/Shared/MasterLayout.cshtml";
}

@(Html.Supermodel().JQMobile.CRUDList>SimpsonsCharacter, SimpsonsCharacterMvcModel>(Model, typeof (SimpsonsCharacterController), "Users"))
And your Detail View will be updated to the following:
@using Domain.Entities
@using Supermodel.Extensions
@{
    Layout = "~/Views/Shared/MasterLayout.cshtml";
}

@(Html.Supermodel().JQMobile.CRUDEdit<SimpsonsCharacter, SimpsonsCharacterMvcModel>("Update Profile", false, true))
This results in the following List and Detail Views:
If you want to create your own custom view, however, you can create generic Views without any styling. Generic rendering doesn't include any CSS, so you can style your application however you like. Again, you will need to update your MasterLayout, your MVC Model, and your Views. Let's start by modifying our MasterLayout:
@RenderBody()

<style>
    body {
          margin: 40px;
      }

      .form-horizontal .controls {
        margin-left: 0px !important;
        margin-top: 20px;
    }
</style>
Next, we must remove calls to JQMobile from both the MVC Model and the Views. Let's start by removing JQMobile from the MVC Model:
namespace Domain.Entities
{
    public class SimpsonsCharacterMvcModel : MvcModelForEntity<SimpsonsCharacter>
    {
        public TextBoxForStringMvcModel Name { get; set; }
        public DropdownMvcModelUsing<OccupationMvcModel> Occupation { get; set; }
        public TextBoxForStringMvcModel VoicedBy { get; set; }
        public DropdownMvcModelUsingEnum<SimpsonsCharacter.GenderEnum> Gender { get; set; }

        public override string Label
        {
            get { return Name.Value; }
        }
    }

    public class SimpsonsCharacter : Entity
    {
        public enum GenderEnum { Male, Female }

        public string Name { get; set; }
        public virtual Occupation Occupation { get; set; }
        public string VoicedBy { get; set; }
        public GenderEnum Gender { get; set;}
    }
}
And finally, we must remove references to JQMobile from the Views. Let's start with the List View:
@using Domain.Entities
@using Supermodel.Extensions
@using Web.Controllers
@model List<SimpsonsCharacterMvcModel>
@{
    Layout = "~/Views/Shared/MasterLayout.cshtml";
}

@(Html.Supermodel().CRUDList>SimpsonsCharacter, SimpsonsCharacterMvcModel>(Model, typeof (SimpsonsCharacterController), "Users"))
And then, we must update the Detail View:
@using Domain.Entities
@using Supermodel.Extensions
@{
    Layout = "~/Views/Shared/MasterLayout.cshtml";
}

@(Html.Supermodel().CRUDEdit<SimpsonsCharacter, SimpsonsCharacterMvcModel>("Update Profile", false, true))
This results in the following List and Detail Views which you can add your own styling to:

At this point, you've seen how easy it is to setup your first Supermodel application, but this short Getting Started lesson only touches on the basics of what Supermodel can do. To learn more about what you can do with Supermodel, read the Tutorials section.